Documentation Index
- Introduction
- Client Software Installation
- Starting RM Noise
- Set your input and output devices
- Set your input level
- The Goal of RM Noise
- RM Noise Modes of Operation
- More on cw operating
- Description of the Main Window
- Description of the Options Window
- Description of the Info Window
- Command Line Flags
- Command Line Examples
- Troubleshooting
| Introduction |
|---|
| The RM Noise project uses AI with the goal of removing noise from SSB voice or CW radio signals. The AI has been trained using noise recordings which are often unique to each setup and location. The client program sends the radio’s noisy output to the AI servers, and the servers remove the noise in real-time and return the audio back to the client for listening. |
| Client Software Installation |
|---|
| Hardware Requirements A Windows 10 or 11 computer with internet access and the computer’s audio line in (or something equivalent) connected to a radio. Software Requirements Windows 10 and 11 have been tested. Windows 7 is no longer supported. Software Installation Download and run the setup program: https://ournetplace.com/rm-noise/client-v0-21-9-7/ (If you later want to remove this software, use Windows add/remove programs.) |
| Starting RM Noise |
|---|
| A username and password is required, and we will be using call signs as usernames. Activate your account here: https://ournetplace.com/rm-noise/registration/ Start RM Noise from the Windows Start menu, and login with your username and password. After a successful login, your credentials will be saved. |
| Set your input and output devices |
|---|
| After login, the radio’s output should be audible using speakers or headphones connected to the computer. If you cannot hear your radio through the computer, set your input device and output device under options. Choose activate settings after any device change. If you still cannot hear your radio or if you hear the radio before you start RM Noise, go to troubleshooting audio below. |
| Set your input level |
|---|
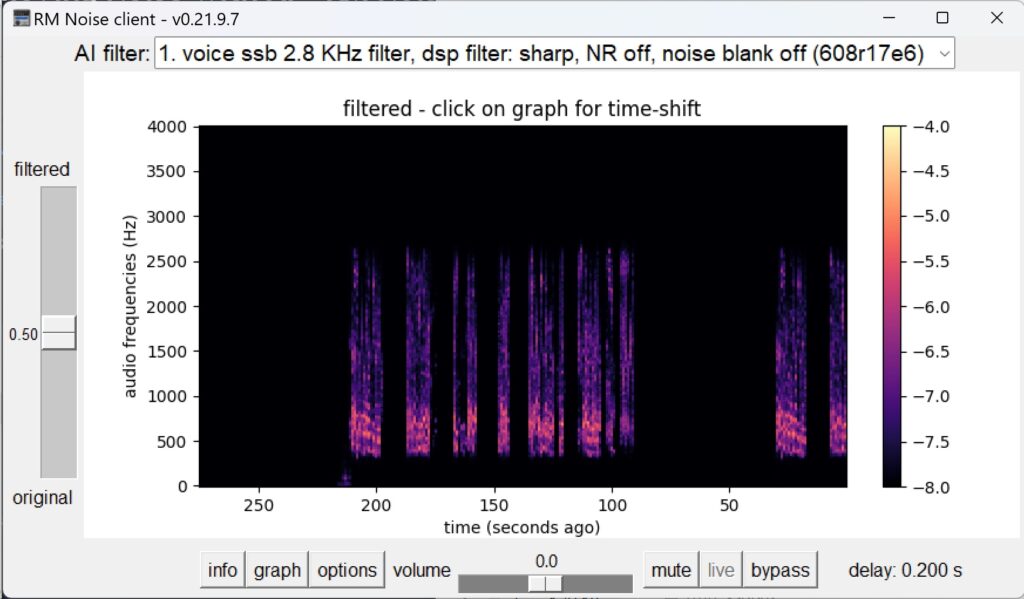
| RM Noise works with any input level. However, with some configurations it is possible for the radio to overdrive the input level of the computer. It is recommended that no color of your noise floor is more than -5.5 on the scale. More information can be found here: https://ournetplace.com/rm-noise/how-to-set-the-input-level/ |
| The Goal of RM Noise |
|---|
| If the slider is set to 100% filtered, and if the noise is sufficiently similar to any of the training set then the noise should be substantially reduced, yet the desired signal will still be audible. If there is no desired signal the output should be silence. If the radio settings are correct and the slider is set to 100% yet the noise is still bleeding through the filter, then the noise can be recorded for addition to the training set. |
| RM Noise Modes of Operation |
|---|
| Live Filtering (Default Mode) a) check that your radio settings are consistent with the current project standard: – Bandwidth: 2.8 kHz (lower values may also work.) – DSP filter shape: sharp – Noise reduction off – Noise blanking off b) tune radio to your desired voice or cw signal c) choose the appropriate voice or cw AI filter from the AI filter dropdown list d) use the original / filtered slider, mute, bypass and time-shift as desired Recording Noise Mode Be aware, the recordings are sent directly to the server. If your noise is not handled well by the current filters, the AI neural network can be trained with custom noise recordings. It may be useful over time to make multiple recordings of different conditions, i.e. band, rain, antenna, direction, etc. This step is not necessary if RM Noise already handles your noise adequately . To record your noise for training: a) check that your radio settings are consistent with the current project standard: – Bandwidth: 2.8 kHz – DSP filter shape: sharp – Noise reduction off – Noise blanking off b) tune radio to a frequency without any cw, voice, wsjt or sine waves, near a desired frequency c) start recording by navigating to options, then enter recording description, set recording minutes to 30 and click start a recording. (Recordings shorter than 30 minutes are not considered for training.) A good naming convention for the description would be YourCall-Band-Antenna-num, for example: k5qe-6M-yagi-1 While recording, you can use the AI filter dropdown, original / filtered slider, mute, bypass and time-shift as desired d) * New step * For training, you must check and submit your recording: – On the website, navigate to ACCOUNT -> RECORDINGS. Login if necessary. – Choose your UNCHECKED recording (It can take up to 30 minutes for new recordings to appear in this list) – Choose HELP and review the guidelines – Confirm that your recording matches the guidelines for INPUT LEVEL, BANDWIDTH, LOWER CUTOFF, NO VOICE, CW, WSJT, and being USEFUL. – Once you check off all of the guideline boxes, you can SUBMIT the recording for training the next AI filter – If the recording does not meet the guidelines, you can DELETE it. – Rejected recordings are removed after 90 days. After a new recording is submitted, it will be inspected and then included in the next training set. The AI server will be updated after the training. Watch ACCOUNT -> RECORDINGS, or SYSTEM STATUS to see when the new AI filter becomes available. More information on recording noise can be found here: https://ournetplace.com/rm-noise/recordings-and-the-top-problems/ https://forum.rmnoise.radio/viewtopic.php?t=30 The training process can take days, but does not need repeating unless your noise conditions materially change. In the future, we hope that the system will better generalize from a large training set and thus, require fewer new recordings. Filtering a Recording Mode Recordings made using the RM Noise client can be downloaded and used as input instead of the radio’s live audio. If you supply your own recording file, the format of the file should be: – 16-bit .wav format – single channel (mono) – sampled at 8kHz (There is a demo recording available for testing. To try the demo recording download the file: https://ournetplace.com/rmnoise/rmnoise-demo-1.wav ) a) To start, navigate to options -> choose the file and select the demo recording file. The file should start playing. Use AI filter, the original / filtered slider and time-shift as desired. While playing, you can use the file position slider to make large changes to the playback location, i.e. jump to the middle of the recording. b) When finished, return to filtering a live signal by navigating to options and enable filter signal at the server from INPUT DEVICE. |
| More on CW operating |
|---|
| For cw, the radio should still be set with a bandwidth filter of 2.8kHz, but the cw AI filter was trained to only recognize cw sidetones between 500Hz and 1050Hz. This gives an effective filter width of 550Hz using the no bandpass setting in options. Tune your signal’s sidetone within this range, and set the original/filtered slider to 100% to reject signals outside of this range. Under options there are also post-filter cw bandpass settings designed to further tighten the width to 250Hz. To use: – choose the setting that matches your sidetone preference – tune the signal’s sidetone within that range – set the original/filtered slider to 100% to reject signals outside of your chosen range. For example, if you prefer your sidetone at 800Hz: – set your radio’s bandwidth filter to 2.8kHz – choose a cw AI filter on the main window – tune your desired signal to 800Hz – move the original/filtered slider to 100% to reject signals outside of 500Hz-1050Hz using the no bandpass default – optionally choose post-filter cw bandpass 750Hz-1000Hz to reject signals outside of 750Hz-1000Hz. |
Main Window

| Description of Main Window |
|---|
| AI Filter The dropdown box lists the available AI filters. Choose the filter that matches your setup. Keyboard keys 1-9 are shortcuts to the AI filters. Original / Filtered Slider This slider controls the output sound blend. The blend is composed of the original noisy signal and the filtered signal, and it can be set anywhere between 0% (original audio, not filtered) and 100% (completely filtered audio). If the desired signal is extremely weak, it may help intelligibility to use filtering less than 100%. Keyboard up/down moves the slider, home jumps to 100% and end jumps to 0% filtered. Time-Shift / Live Button You can listen to recent audio by clicking on the spectrogram graph. The audio will play, starting at the time you clicked. During time-shift, a green rectangle is displayed on the graph and indicates the time where the audio is being replayed. Keyboard left/right adjusts time-shift back/forward in time. You can return to live audio by clicking the Live button or pressing the l key. Note: Time-shift reviews previously filtered audio, and it is not possible to review audio with a different AI filter. Volume / mute / options window Keyboard +/- will raise/lower the volume. Keyboard m will toggle the mute. Keyboard o will open the options window. Bypass This option bypasses the server and sends the signal from the input device to the output device without using the server. Keyboard b will toggle bypass. Graph button The graph button toggles the main graph between displaying the filtered audio and the original audio. The current graphing mode is displayed above the main graph. Info and Options Buttons These buttons open their respective windows. Delay This is the time between receiving the signal from the soundcard and delivering the signal back to the soundcard for playing. The soundcard’s buffering time and the neural net’s lookahead latency are additional components of the absolute time between the signal leaving the radio and playing through the headphones. Drift If you are listening to another radio’s signal, the drift replaces delay. Drift is a measure of how far behind the sound leaving your headphones is from the live audio plus the minimum internet and server latency. Standby If there is no input signal for 5 minutes, the client enters standby mode. In standby mode the client stops sending audio to the server and standby is displayed on the main window. The system also enters standby mode if mute or bypass are activated for 15 minutes. Standby is canceled when a signal is detected and mute and bypass are not activated. |
Options Window

| Description of Options Window |
|---|
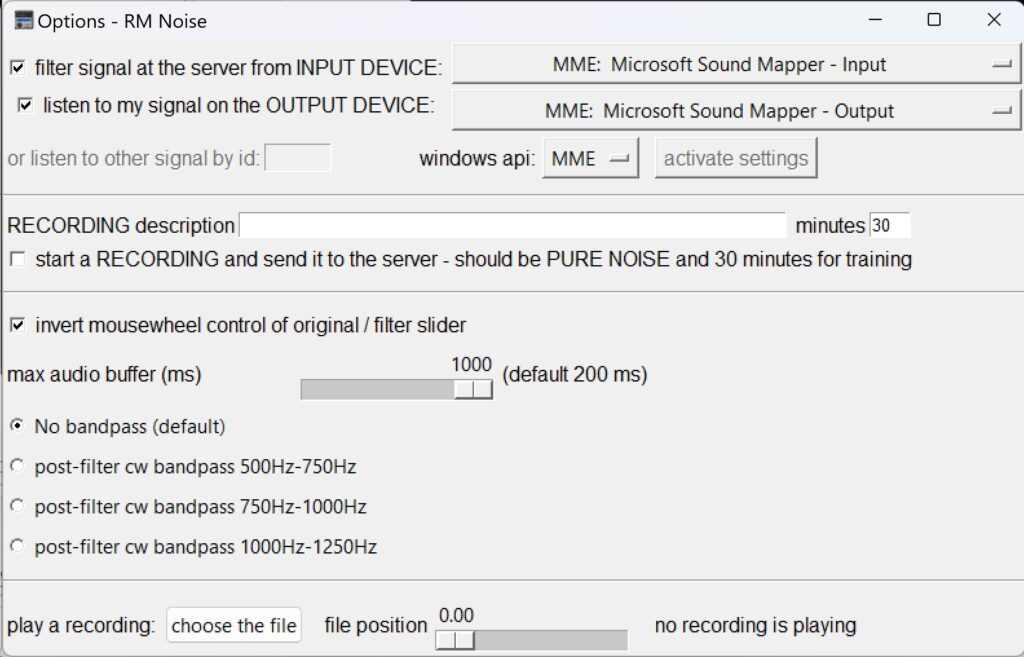
| Input device dropdown list The default input device is the Microsoft sound mapper (the input choice is taken from Window’s settings). Use the dropdown to force input to another device. When you are satisfied with your change, choose activate settings. This choice is saved. Output device dropdown list The default output device is the Microsoft sound mapper (the output choice is taken from Window’s settings). Use the dropdown to force output to another device. When you are satisfied with your change, choose activate settings. This choice is saved. Listen to my signal / enter signal id By default you listen to the audio signal from your input device. By unchecking this, you can enter the signal id of another client and listen to another radio. The signal id is a random code that you can manually give to another operator for testing and monitoring purposes. You can use this feature to have a computer connected to the radio and monitor it from 1 or more different computers. Filter signal at the server By default your computer sends the radio’s audio to the AI server. Un-check filter signal at the server to prevent audio from being sent to the server. Invert mousewheel The mousewheel can be used on the main window to adjust both the original/filter slider and the volume. Check invert mousewheel if the behavior of these functions are backwards. Max audio buffer Internet glitches often delay an audio stream. If unchecked, the audio playing can be become unacceptably delayed behind the live signal. This buffer controls the tradeoff between delay and dropping late audio frames. The default max audio buffer is 200 ms. This means the maximum delay allowed is 200 ms beyond the average internet and server latency. – A lower buffer guarantees a shorter delay, but it is possible that more late audio frames will be dropped. – A higher buffer means fewer audio frames will be dropped for being late, but a longer delay is possible. Post-filter CW bandpass options The bandpass settings designed to further tighten the filter width to 250Hz. Note: The 3’rd bandpass filter is effectively 1000-1050Hz because the AI filter ignores tones above 1050Hz. Start a recording / recording description / minutes These options make an unfiltered recording of the radio’s output, and allows clients to provide samples of their noise for evaluation and training purposes. The recordings are sent directly to the server. For more details, see recording noise above. Play a recording / choose the file / file position slider Recordings can be used as input instead of the radio’s live audio. Use the choose file window to choose a wav recording. The .wav recording should be mono and sampled at 8 kHz. When playing a recording, move the file position slider to make large changes to the playback location, i.e. jump to the middle of the recording. |
Info Window

| Info Window Description |
|---|
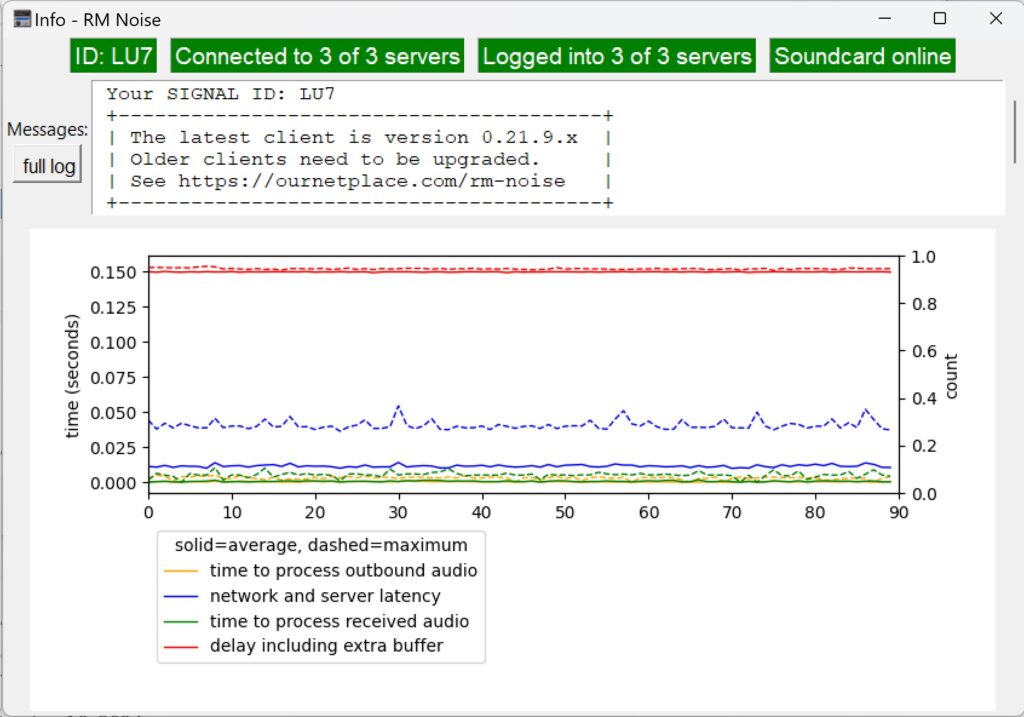
| ID The ID is used to Listen to other signal by ID in options Messages This box shows messages from both the server and the client Full Log This button toggles the Full Log window Info Graph This graph displays latency metrics including network and server latency and the overall delay. Warning counters are also displayed. The following is a list of the error counters. |
| Warning Counter | Description |
|---|---|
| corrupt udp packet | A corrupted UDP packet was received |
| audio input level too high | The input level was too high – turn down the input level or volume of the radio |
| audio output level too high | The volume was set too high – turn down the volume on the main window |
| audio buffer exceeded count | The network packet arrived beyond the average latency plus the configured max audio buffer time and was dropped – consider raising max audio buffer under options |
| lost packet count | The network packet was lost |
| out of order packet count | Network packets arrived out of order and the order was corrected |
| Command Line Flag | Description |
|---|---|
--disable_graph | This option will disable the main graph to reduce processing requirements |
--max_buffer <time-in-ms> | Set the max audio buffer. In very high latency environments, this option can be used to raise the max audio buffer beyond the limits in the options slider. |
--frame_buffers <number-of-buffers> | Set the frame buffers which default to 150. In very high latency environments, this option can be increased to avoid audio dropouts. |
--username <username> | Set the username. Saved on successful login |
--password <password> | Set the password. Saved on successful login |
--filter_num <AI-filter-number> | Set the AI filter number. Saved |
--recording_name <recording-description> | Set the name for a recording. When used with recording minutes, RM Noise will immediately start a recording when launched. |
--recording_minutes <number-of-minutes> | Set the length of the recording, used with recording_name |
| Command Line Examples |
|---|
This example launches RM Noise with the specified username:rmnoise.exe --username k5qeThis example launches RM noise and makes a recording: rmnoise.exe --recording_name 6m-yagi-east-rain --recording_minutes 35 |
| Troubleshooting Audio |
|---|
| Audio Hardware Setup The radio’s audio out should be connected to the computer’s audio line in, and your headphones/speaker should be connected to the computer’s headphone/speaker jack. Problem: No Sound or Wrong Audio Input Choose the correct input device and output device in options. A restart is not necessary unless you use the make changes to the Microsoft sound mapper while RM Noise is running. Microsoft Sound Mapper Alternatively, you can let windows manage the input and/or output devices. Choose the correct input and/or output device in windows, and then choose Microsoft sound mapper in RM Noise. Restart RM Noise after any change. Instructions for Windows 10: Navigate to settings -> system -> sound -> input -> choose your input device, then choose the device connected to the radio. The output device is handled similarly. Instructions for Windows 11: Navigate to settings -> system -> sound -> input -> choose a device for speaking or recording, then choose the device connected to the radio. The output device is handled similarly. Problem: Radio is Audible Before Starting RM Noise The radio should NOT be heard through the headphones or speakers before RM Noise has been started. If you hear the radio before RM Noise has been started, it is likely because of a setting in Windows or the soundcard software. To check the Windows settings: Instructions for Windows 11: Navigate to settings -> system -> sound -> input -> (choose the input device connected to your radio) -> advanced (under enhance audio) -> listen tab Ensure listen to this device is not checked Instructions for Windows 10: Navigate to settings -> system -> sound -> input device properties (not sound device properties) -> additional device properties -> listen tab Ensure listen to this device is not checked |